Tevo Tarantula Firmware Upgrade Overview
The Tevo Tarantula is a popular and affordable 3D printer, beloved by hobbyists and makers alike. However, like any piece of technology, its performance can be significantly enhanced through firmware upgrades. This guide provides a comprehensive walkthrough on how to upgrade your Tevo Tarantula’s firmware, ensuring you can unlock its full potential. Upgrading the firmware can lead to improved print quality, added features, and enhanced stability. This process involves replacing the existing software on your printer’s control board with a newer version. While it might seem daunting at first, following the steps carefully will guide you through the entire process, transforming your printer’s capabilities.
Why Upgrade Your Tevo Tarantula Firmware
Upgrading the firmware on your Tevo Tarantula offers a multitude of advantages, transforming the printer’s performance and usability. The benefits extend beyond mere operational improvements, positively influencing the overall 3D printing experience. Firmware upgrades can fix bugs, enhance printing performance, and introduce new functionalities. These enhancements not only improve the quality of your prints but also expand the capabilities of your 3D printer. By keeping your firmware up-to-date, you’re ensuring that your printer is running at its best and taking advantage of the latest developments in 3D printing technology.
Benefits of the Upgrade

Upgrading the firmware on your Tevo Tarantula brings several advantages. You can expect to see improved print quality due to refined algorithms and calibration options. Newer firmware versions often fix bugs and glitches present in older versions, leading to a more stable printing experience. Furthermore, new firmware may introduce new features such as support for different types of filaments or enhanced control over printer settings. These improvements can lead to smoother prints and faster print times. Upgrading firmware gives access to improved temperature control, better motor control, and enhanced safety features.
Potential Risks and Considerations
While upgrading your Tevo Tarantula’s firmware offers many benefits, it’s essential to be aware of potential risks. Incorrectly flashing the firmware can potentially damage the printer’s control board, rendering it non-functional. Always ensure the firmware you’re installing is compatible with your specific printer model and control board. There is a possibility that the new firmware may introduce compatibility issues with existing hardware or software. Always back up your current firmware before beginning the upgrade to allow for restoration if problems arise. Also, make sure you have a stable power supply during the upgrade. Carefully follow all instructions to minimize these risks.
Preparing for the Tevo Tarantula Firmware Upgrade
Before diving into the firmware upgrade process, proper preparation is vital for a smooth experience. This involves gathering the necessary materials, downloading the correct firmware, and identifying your printer’s control board type. This preliminary work ensures that all your bases are covered, preventing any unexpected issues during the flashing process. Make sure your printer is properly assembled and functioning. Take the time to understand the steps involved. Careful preparation minimizes the risk of errors, allowing you to upgrade your firmware successfully.
Gathering Necessary Materials

You’ll need a few essential items to upgrade your Tevo Tarantula’s firmware. First, you’ll need a computer with a USB port. You’ll also need a USB cable to connect your printer to your computer. Next, you will need to download and install the Arduino IDE (Integrated Development Environment) on your computer. This software is used to upload the firmware to the printer’s control board. You may also need a screwdriver set to access your printer’s control board. Having these materials prepared beforehand will streamline the process.
Downloading the Firmware
The next step involves downloading the correct firmware for your Tevo Tarantula. You can find pre-compiled firmware or source code on various online platforms. Websites like GitHub or Marlin Firmware are excellent places to start. It is crucial to download a firmware version that is compatible with your specific control board. Look for firmware designed for the Melzi board. Download the firmware file as a .hex file or as source code if you plan to compile it yourself. Always verify the source and integrity of the firmware file to prevent the installation of corrupted or malicious files.
Identifying Your Board Type
Before you flash the firmware, identify your Tevo Tarantula’s control board. Open up the electronics enclosure on your printer and examine the board. The Tevo Tarantula often comes with a Melzi board. Carefully inspect the board for any markings or labels that specify its model. Knowing your board type is essential because you need to select the appropriate firmware settings for your specific hardware. If unsure, consult your printer’s documentation or the manufacturer’s website for assistance. Incorrect settings may lead to non-functionality and damage to your printer. Correct identification of your board is the first step for a successful upgrade.
Step-by-Step Tevo Tarantula Firmware Upgrade Guide

This step-by-step guide walks you through the process of upgrading your Tevo Tarantula firmware. These instructions provide a clear pathway, from configuring the Arduino IDE to uploading the new firmware. Make sure you follow the instructions carefully to ensure a successful upgrade. Patience and attention to detail are key. The process is not overly complex, but precision is essential to avoid problems. By following this comprehensive guide, you’ll be able to enjoy the latest firmware on your Tevo Tarantula and experience improved print quality.
Flashing the Firmware Using Arduino IDE
One of the most common methods for flashing firmware on your Tevo Tarantula is by using the Arduino IDE. This approach is user-friendly and versatile, making it a great option for both beginners and experienced users. Ensure you have installed the Arduino IDE on your computer and that you have the correct firmware file ready. This process involves connecting your printer to your computer and uploading the firmware via the Arduino IDE interface. This process involves several steps, including setting up the Arduino IDE, configuring the printer’s board settings, and uploading the firmware.
Configuring Arduino IDE
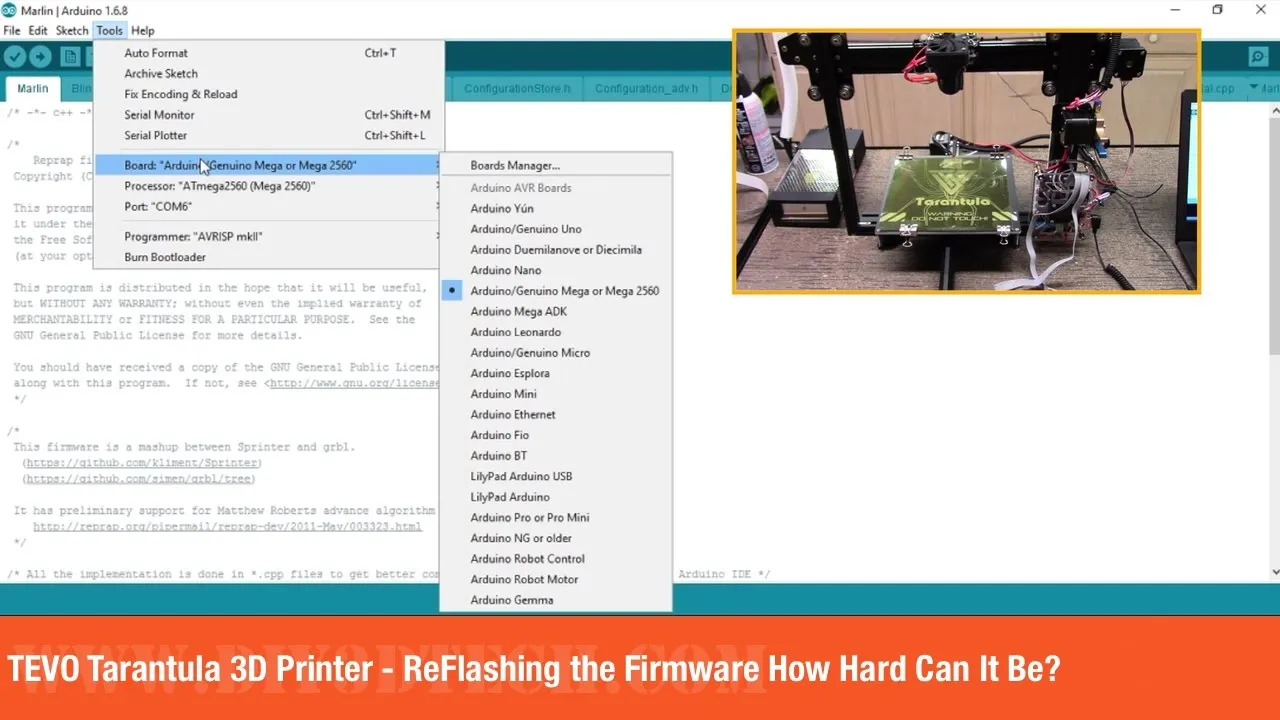
Before uploading the firmware, configure the Arduino IDE. First, you must select your printer’s board in the Arduino IDE. In the ‘Tools’ menu, select ‘Board’ and choose the appropriate board type (Melzi). You must also select the correct COM port, which allows the Arduino IDE to communicate with your printer. Under the ‘Tools’ menu, click ‘Port’ and select the port corresponding to your printer. Next, configure the programmer settings. Under the ‘Tools’ menu, click on ‘Programmer’, and select ‘Arduino as ISP’. By correctly configuring these settings, you’ll ensure a successful firmware upload. Be careful about the selection; incorrect choices can lead to errors.
Uploading the Firmware

After configuring the Arduino IDE, you can upload the firmware. Open the firmware file in the Arduino IDE. Click the ‘Upload’ button (the right-pointing arrow) to start the uploading process. The Arduino IDE will compile the firmware, and once that is done, it will upload it to your Tevo Tarantula’s control board. Watch the status bar at the bottom of the Arduino IDE window to monitor the upload progress. If the upload is successful, you’ll see a ‘Done uploading’ message. If there are errors, carefully review the error messages and troubleshoot accordingly. Successful uploading is a good sign that your Tevo Tarantula is ready.
Flashing the Firmware Using a Bootloader
Some users prefer using a bootloader, which simplifies the firmware upgrade process. The bootloader is a small program that runs on the microcontroller and allows you to upload firmware without needing an external programmer. To use a bootloader, you’ll usually need to install the bootloader on your board. This process may involve using the Arduino IDE and an external programmer. Once the bootloader is installed, you can upload the new firmware via the Arduino IDE. Uploading through a bootloader can make the process more streamlined, as you won’t need to worry about an external programmer. Ensure you follow the bootloader’s instructions to flash the new firmware.
Troubleshooting Common Firmware Upgrade Issues
During the firmware upgrade process, you may encounter certain issues. These problems can range from connectivity errors to display malfunctions. Knowing how to address these common problems can save you a great deal of time and frustration. Common issues include problems with connectivity, display errors, and printing problems. This section offers solutions to various issues that may arise during the firmware upgrade process. Armed with these troubleshooting tips, you can get back to printing in no time.
Connectivity Problems

Connectivity issues are common during firmware upgrades. Ensure that the USB cable is securely connected between your computer and your Tevo Tarantula. If you’re still having trouble, try a different USB cable or a different USB port on your computer. Check the drivers for the printer to make sure they are properly installed. You may need to reinstall the drivers to resolve any connectivity problems. Sometimes, the COM port selected in the Arduino IDE might be incorrect; verify that the correct port is selected. Resolving connectivity issues is often the first step in troubleshooting the firmware upgrade process.
Display Issues
Display issues are another common problem after a firmware upgrade. If the display on your Tevo Tarantula is not working or showing garbled text, it may indicate a firmware compatibility issue. Make sure you have chosen the correct display settings in the firmware configuration. If you’re using custom firmware, review the display configuration files. Consider reflashing the firmware with the correct settings for your display. Also, check the display cable connections to ensure they are secure. Resolving these display issues often depends on ensuring the correct firmware configuration for your specific display type.
Printing Problems
Printing problems after a firmware upgrade might manifest in various forms, such as poor print quality, incorrect movement, or the printer not responding. Verify that your printer is properly calibrated. Check the firmware settings for your printer, and ensure they match your printer’s hardware configuration. If your prints are not sticking to the bed, you may need to adjust your bed leveling. If the printer is behaving erratically, you should revert to the previous firmware version, which is a possible temporary solution. Troubleshooting print issues often involves carefully checking all settings to match your printer’s mechanical and electrical configuration.
Calibrating Your Tevo Tarantula After Firmware Upgrade

After a successful firmware upgrade, it’s important to calibrate your Tevo Tarantula to ensure optimal print quality. Calibration involves several steps, including bed leveling and extruder calibration. Correct calibration is crucial for achieving consistent and high-quality prints. Taking the time to calibrate your printer after a firmware upgrade will ensure its performance is optimized, giving you the best results. Calibration is not just an optional step; it’s an integral part of the post-upgrade process.
Bed Leveling
Bed leveling is crucial for first-layer adhesion and overall print quality. Use the bed leveling feature in your printer’s firmware to level the print bed. Manually level the bed using the adjustment screws at each corner. Once leveling, use the Z-offset adjustment. Adjust the Z-offset until the first layer prints smoothly. Repeating the leveling process several times may be needed to get the perfect results. Proper bed leveling provides a stable base for your prints.
Extruder Calibration
Calibrating the extruder is essential for accurate filament extrusion. Calibrate the extruder by first marking a point on the filament at a known distance from the extruder. Then, instruct the printer to extrude a specific amount of filament (e.g., 100mm). Measure the distance the filament traveled. Based on this measurement, adjust the e-steps value in your firmware to correct the extrusion rate. Proper extruder calibration ensures your printer extrudes the correct amount of filament.
Final Thoughts
Upgrading your Tevo Tarantula’s firmware is a worthwhile endeavor that can significantly improve your 3D printing experience. From troubleshooting connectivity issues to calibrating your printer, you are well-equipped to upgrade your firmware. Ensure that you carefully follow each step and take your time. With patience and attention to detail, you can unlock the full potential of your Tevo Tarantula and create exceptional prints. If you run into problems, don’t be afraid to consult online forums or seek help from the 3D printing community. Happy printing!