What is an Oldham Coupler and Why Use It?
The Tevo Tarantula is a popular 3D printer known for its affordability and ease of use. However, like any machine, it can be improved. One common upgrade is the installation of an Oldham coupler. But what exactly is an Oldham coupler, and why should you consider one for your Tevo Tarantula? An Oldham coupler is a type of flexible coupling used to connect the stepper motor to the Z-axis lead screw. Its primary function is to compensate for any misalignment between these two components. This is crucial in 3D printing, as even slight misalignments can lead to significant printing problems. The stock coupler on the Tevo Tarantula, while functional, is often made of less durable materials and doesn’t offer the same level of flexibility as an Oldham coupler. This guide will walk you through everything you need to know about upgrading to an Oldham coupler on your Tevo Tarantula, from understanding the benefits to the step-by-step installation process.
Understanding the Tevo Tarantula’s Stock Coupler Problems
The stock coupler that comes with the Tevo Tarantula often suffers from several issues that can affect print quality and overall printer performance. Understanding these problems is the first step towards appreciating the benefits of an Oldham coupler. The stock coupler, typically made of a rigid or semi-rigid material, does not effectively absorb or compensate for minor misalignments between the stepper motor and the lead screw. Over time, this can cause the coupler to wear down, leading to decreased print quality. The original coupler’s design may not provide enough flexibility to accommodate these small imperfections in alignment. This lack of flexibility results in Z-axis wobble, layer shifting, and even complete print failures. Moreover, the stock coupler may transmit vibrations from the motor directly to the Z-axis, further exacerbating these issues. Therefore, upgrading to a more flexible and durable solution like an Oldham coupler is often a recommended improvement for improving print quality.
Symptoms of a Failing Stock Coupler

Recognizing the signs of a failing stock coupler can help you determine when it’s time for an upgrade. Several telltale symptoms indicate that your coupler may be causing problems. One of the most common issues is Z-axis wobble. This manifests as inconsistent layer lines, where the printed layers appear wavy or uneven. You might also experience layer shifting, where the entire print shifts horizontally, resulting in a misaligned model. Another symptom is inconsistent Z-axis movement. If the coupler isn’t properly transferring the motor’s rotation to the lead screw, your prints may have incorrect heights or inconsistent layer heights. Furthermore, if your prints frequently fail or exhibit poor surface quality, it’s another indication the coupler might be the source. Regularly inspecting your prints and comparing them to your previous output is a proactive way to identify such problems and ensure timely maintenance.
Benefits of Upgrading to an Oldham Coupler
Upgrading to an Oldham coupler offers several significant advantages for your Tevo Tarantula, leading to improved print quality, reliability, and overall user experience. The Oldham coupler’s design specifically addresses the shortcomings of the stock coupler, providing numerous benefits that make it a worthwhile investment. The key advantage is its ability to compensate for misalignments between the stepper motor and the Z-axis lead screw. This flexibility minimizes the impact of vibrations and imperfections, resulting in smoother and more accurate prints.
Improved Print Quality
One of the primary benefits of using an Oldham coupler is a noticeable improvement in print quality. By effectively mitigating the effects of misalignment, the Oldham coupler helps to eliminate or significantly reduce common printing issues. You can expect to see a reduction in Z-axis wobble, where the printed layers appear wavy or inconsistent. Smoother layer lines contribute to a more polished finish, making your prints look cleaner and more professional. The precision offered by an Oldham coupler leads to improved dimensional accuracy, so your prints will more closely match your intended designs. This is particularly important for parts that need to fit together precisely.
Reduced Z-Axis Wobble

Z-axis wobble is a common issue with many 3D printers, and the Tevo Tarantula is no exception. The Oldham coupler is designed to minimize this problem. The flexible nature of the Oldham coupler allows it to absorb any minor misalignments or vibrations that might occur between the stepper motor and the Z-axis lead screw. This leads to a significant reduction in Z-axis wobble. As a result, the printed layers align more accurately, and the overall print quality improves dramatically. With reduced wobble, you’ll see a smoother surface finish on your prints, improving the final product’s appearance. This contributes to greater consistency and reliability in your printing process.
Easy Installation
Another significant advantage of the Oldham coupler is its ease of installation. The upgrade process is relatively straightforward and can be done with basic tools and minimal technical expertise. Unlike some 3D printer upgrades that require extensive modifications or disassembly, installing an Oldham coupler is usually a quick and simple task. The main steps involve removing the stock coupler and replacing it with the Oldham coupler. Most Oldham couplers come with clear instructions and all the necessary hardware. This means that you don’t need to spend hours studying complicated manuals or modifying your printer. With its user-friendly design, the Oldham coupler makes it a perfect upgrade for beginners and experienced users alike. The ease of installation makes it a popular choice for those seeking to improve their printer’s performance without undertaking a complex project.
Choosing the Right Oldham Coupler for Your Tevo Tarantula
Selecting the right Oldham coupler for your Tevo Tarantula is an important step in ensuring a successful upgrade. Not all Oldham couplers are created equal, and the wrong choice can lead to issues like improper fit or performance problems. Several factors should be considered before making a purchase. The primary considerations are material, size, and compatibility.
Material Considerations

The material used to construct an Oldham coupler significantly impacts its durability and performance. Consider the material of the flexible disc used in the coupler. Common materials include Delrin, aluminum, and sometimes other plastics. Delrin is generally a good choice due to its excellent wear resistance and low friction. Aluminum couplers offer greater rigidity, which can be beneficial in reducing wobble. Make sure the material is strong and can withstand the stresses of continuous use. Carefully research the material properties to ensure they align with your printing requirements. You may choose between different materials based on your specific needs and the printing materials you frequently use.
Size and Compatibility
Size and compatibility are crucial factors when choosing an Oldham coupler for your Tevo Tarantula. The coupler must fit the motor shaft and the lead screw properly. Measure the diameter of the stepper motor shaft and the lead screw to ensure the coupler you select matches these dimensions. Double-check the specifications to ensure the Oldham coupler is designed for the Tevo Tarantula or printers with similar motor and lead screw configurations. Buying a coupler that is not the right size can cause issues with your prints and potentially damage your printer. Confirm that the hardware, such as set screws, is included and is of good quality. Checking customer reviews can also help you gauge the compatibility of a certain product.
Where to Buy an Oldham Coupler
Once you understand what an Oldham coupler is and how to select the right one, you’ll need to know where to find it. Several online retailers and specialty stores sell Oldham couplers suitable for the Tevo Tarantula. Online marketplaces like Amazon and eBay offer a wide variety of options from different manufacturers at varying price points. These marketplaces often provide customer reviews, which can be helpful in assessing product quality and compatibility. Another good source is 3D printing specialty stores. These stores often carry high-quality parts specifically designed for 3D printers, and they can provide expert advice. Additionally, consider checking the manufacturers’ websites. Many 3D printer manufacturers and component suppliers sell directly to the consumer. Before making a purchase, compare prices, read reviews, and check the seller’s return policy. This will help you make an informed decision and ensure you get a reliable and high-quality product.
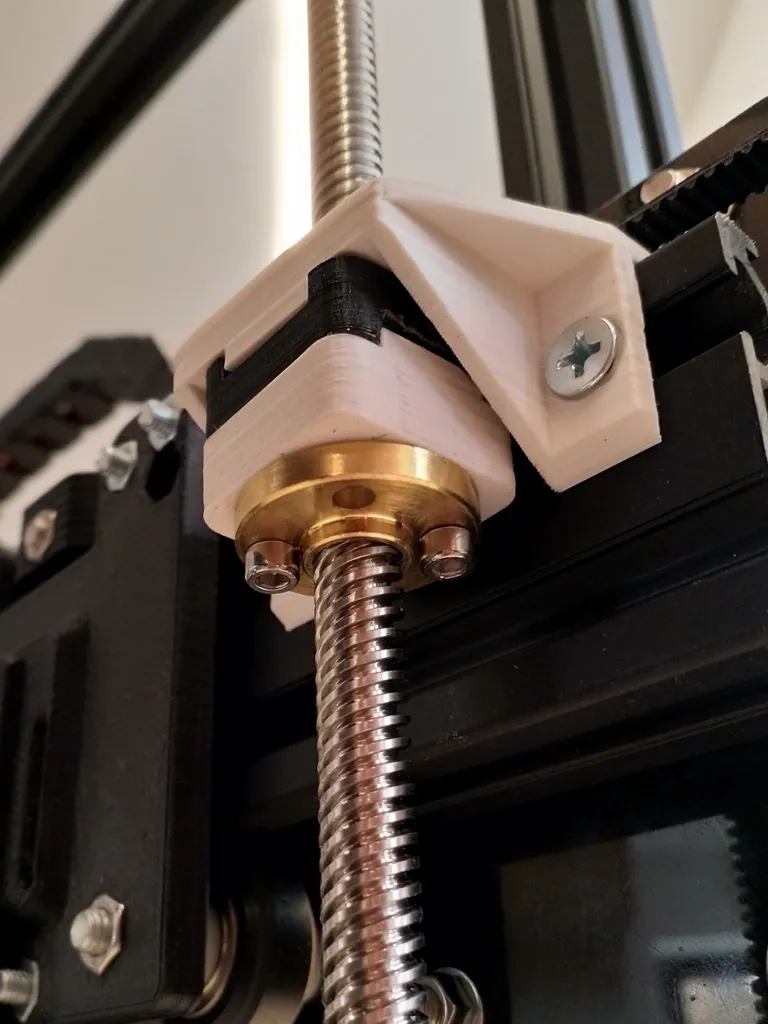
Step-by-Step Installation Guide

Installing an Oldham coupler on your Tevo Tarantula is a straightforward process that can greatly improve your printer’s performance. Here’s a step-by-step guide to help you through the installation. Before you begin, make sure your printer is turned off and unplugged for safety.
Tools Needed
- Allen Wrench Set
- Screwdriver (if needed for your specific printer model)
- New Oldham Coupler
- Optional: Small ruler or calipers for measuring
Removing the Stock Coupler
The first step is to remove the stock coupler from your Tevo Tarantula. This usually involves loosening the set screws that hold the coupler in place. Locate the coupler, which connects the stepper motor to the Z-axis lead screw. Using the appropriate Allen wrench, loosen the set screws on the stock coupler. Some stock couplers may have two set screws. Once the set screws are loose, you should be able to slide the stock coupler off the motor shaft and the lead screw. If the coupler is stuck, gently wiggle it back and forth while pulling it off. Be careful not to damage the motor shaft or the lead screw during removal.
Installing the New Oldham Coupler

With the stock coupler removed, you can now install the new Oldham coupler. First, make sure the flexible disc is properly installed in the Oldham coupler body. Slide the Oldham coupler onto the stepper motor shaft, ensuring it is aligned with the lead screw. Position the coupler so that it sits snugly between the motor and the lead screw, with the flexible disc centered. Tighten the set screws on the Oldham coupler, using the Allen wrench. Make sure the screws are tight enough to prevent slippage but avoid over-tightening, which could damage the coupler or the motor shaft. Double-check that the lead screw spins freely after installation to ensure it is not binding.
Ensuring Proper Alignment
Proper alignment is critical for the Oldham coupler to function effectively. While the coupler is designed to compensate for misalignments, it’s still important to ensure that the motor shaft and the lead screw are as close to being perfectly aligned as possible. Visually inspect the alignment before tightening the set screws. The flexible disc in the Oldham coupler should appear centered and not overly compressed. If the alignment seems off, make small adjustments to the position of the motor or the lead screw until the disc is properly positioned. Before finalizing the installation, rotate the lead screw by hand to check for any binding or resistance. If you feel any binding, loosen the set screws, readjust the alignment, and retighten.
Calibrating Your Z-Axis After Installation
After installing the Oldham coupler, it’s essential to calibrate your Z-axis to ensure accurate print heights. The installation process may slightly change the Z-axis position, so recalibration is necessary. Home your printer to establish the zero position for the Z-axis. This will move the print bed to its lowest position. Once the printer is homed, use the printer’s control panel to move the Z-axis up and down. Observe the movement of the Z-axis and ensure it is smooth and consistent. Check that the nozzle is the correct distance from the print bed at various points. If necessary, adjust the Z-offset in your printer’s settings. Conduct a test print to verify that the first layer adheres correctly and that the print height is accurate. Make adjustments to your Z-offset if the first layer is too high or too low. Fine-tuning the Z-offset is important for achieving excellent print quality.
Troubleshooting Common Issues

Even with a well-installed Oldham coupler, you might encounter some issues. Troubleshooting common problems can help you resolve these quickly and ensure optimal print performance.
Nozzle Scraping on the Bed
If the nozzle is scraping on the print bed after installing the Oldham coupler, it indicates the Z-offset may need adjustment. The Z-offset determines the distance between the nozzle and the bed. The installation might have changed this distance, so recalibration is necessary. Adjust your Z-offset in the printer’s settings. Lower the Z-offset in small increments until the nozzle is just the correct distance from the bed. The goal is to have the first layer adhere well without the nozzle scraping. Conduct a test print after adjusting the Z-offset to ensure the first layer adheres properly. Make small adjustments until the first layer looks perfect.
Layer Shifting
Layer shifting is a common 3D printing problem, and while the Oldham coupler helps to reduce this, other factors can still cause it. If you experience layer shifting after installing the coupler, there are several potential causes to consider. Make sure all belts are properly tensioned. Loose belts can cause the print head to shift during printing. Check the set screws on the Oldham coupler to ensure they are tight and not allowing the motor or lead screw to slip. Also, examine the X and Y-axis belts and pulleys for any signs of wear or damage. Check that your printer’s frame is stable. Ensure that your printer is placed on a stable surface to prevent vibrations. Finally, confirm that your stepper motor drivers are set correctly, and they are not overheating.
Tips for Optimal Performance
To get the most out of your Oldham coupler and maintain peak performance, follow these tips. Proper maintenance and some fine-tuning can significantly enhance your printing experience.
Regular Maintenance
Regular maintenance is key to ensuring your 3D printer operates smoothly and efficiently. Inspect the Oldham coupler periodically to check for any signs of wear or damage. Examine the set screws to ensure they remain tight. Make sure all moving parts are lubricated with a suitable lubricant, which reduces friction and wear. Check the printer’s belts, pulleys, and bearings and replace them if necessary. Regularly clean your printer’s components. These basic maintenance tasks will extend the lifespan of your 3D printer and maintain print quality.
Fine-Tuning Your Printer Settings
Fine-tuning your printer settings can optimize print quality and overall performance. Experiment with different printing speeds and accelerations to find the best settings for your specific printer and filament. Calibrate your extruder to ensure accurate filament extrusion. This is vital for dimensional accuracy and print quality. Adjust your layer height settings to find the optimal balance between speed and detail. Fine-tune your bed leveling and Z-offset to get perfect first-layer adhesion. Experiment with different temperatures for your nozzle and print bed. You can often find the optimal temperature range by consulting your filament’s recommendations.
Conclusion Oldham Coupler for Tevo Tarantula
Upgrading your Tevo Tarantula with an Oldham coupler is a worthwhile investment that can significantly improve your 3D printing experience. From eliminating Z-axis wobble to enhancing print quality, the benefits are clear. The installation process is simple, making it a perfect upgrade for users of all skill levels. By understanding the benefits, choosing the right coupler, and following the installation steps, you can easily enhance your printer’s performance. Remember to troubleshoot any issues and regularly maintain your printer for continued success. With the Oldham coupler upgrade, your Tevo Tarantula will be better equipped to produce accurate, high-quality prints consistently. Embrace the upgrade and enjoy a smoother, more reliable 3D printing experience.